How to merge layers in photoshop - How to
Need to merge layers in Photoshop? Don’t flatten the image and lose all your work. Learn how to merge a copy of your existing layers onto a separate layer! For Photoshop CC and earlier.
Merging layers
When you have finalized the content of layers, you can merge them to reduce the size of your image files. When you merge layers photoshop cc, the data on the top layers replaces any data it overlaps on the lower layers. The intersection of all transparent areas in the merged layers remains transparent.
You cannot use an adjustment or fill layer as the target layer for a merge.
In addition to merging layers, you can stamp them. Stamping allows you to merge the contents of more than one layer into a target layer while leaving the other layers intact.
When you save a merged document, you cannot revert back to the unmerged state; the layers are permanently merged.
Written by Steve Patterson.
When working with multi-layered Photoshop documents, you often reach a point where you need to flatten the image. Usually it’s so you can sharpen the image for print or for uploading to the web. Or you may want to move the image to another layout or design.
But while Photoshop does have a Flatten Image command, it’s not the solution you’re looking for. When you flatten the image, you lose all of your layers. And if you save and then close the document after flattening the image, those layers are lost forever.
So in this tutorial, I’ll show you a better way, one that’s entirely non-destructive. You’ll learn how to merge your layers onto a separate layer and keep your existing layers intact!
But there’s a trick. You won’t find a “Merge All Layers To A New Layer” command anywhere in Photoshop. Instead, you need to know a secret keyboard shortcut. And while not everyone is a fan of keyboard shortcuts, I think you’ll agree that this one is definitely worth knowing.
Let’s get started!
Why you should not flatten a Photoshop document
Before we learn how to merge layers onto a new layer, let’s take a quick look at why flattening an image is a bad idea. I’m using Photoshop CC but you can follow along with any recent version.
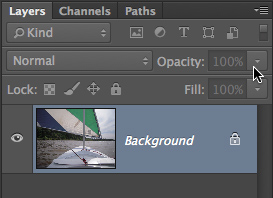
In the Layers panel, we see that I’ve added several layers to my document. Along with the original image on the Background layer, I also have a separate layer for smoothing skin. Above that is a layer for whitening teeth. And at the top is a layer for changing eye color:
If I was done working on the image, I might want to print it, email it, or upload it to the web. But first, I would want to sharpen the image. And before I could sharpen it, I would need to merge all of my layers onto a single layer.
The problem with flattening the image
One way to merge layers in Photoshop is to simply flatten the image. And I could do that by going up to the Layer menu in the Menu Bar and choosing the Flatten Image command:
But here’s the problem. By flattening the image, I’ve lost all of my layers. And if I save and close the document at this point, my layers will be gone for good, along with my ability to edit any of those layers in the future:
I’ll undo that and restore my layers by going up to the Edit menu and choosing Undo Flatten Image:
How to merge layers onto a new layer
Here’s a better way to work. Rather than flattening the image, we can keep our existing layers and just merge a copyof them onto a brand new layer!
Step 1: Select the top layer in the Layers panel
Whenever we add a new layer, Photoshop places it directly above the currently-selected layer. So since you’ll most likely want the merged copy to appear above your existing layers, start by selecting the top layer in the Layers panel:
Step 2: Merge a copy of the layers onto a new layer
Then use the secret keyboard shortcut to merge a copy of your layers onto a new layer.
On a Windows PC, press Shift+Ctrl+Alt+E. On a Mac, press Shift+Command+Option+E. Basically, it’s all three modifier keys, plus the letter E.
And if we look again in my Layers panel, we now see a brand new layer above the original layers. This new layer holds a merged copy of all the other layers in the document:
Step 3: Rename the new layer “Merged”
At this point, it’s a good idea to give the merged layer a more descriptive name. Double-click on the existing name (in my case, it’s “Layer 1”), rename the layer “Merged”, and then press Enter (Win) / Return (Mac) on your keyboard to accept it:
And there we have it! That’s how easy it is to avoid flattening your image by merging your layers onto a new layer in Photoshop!
Check out our Photoshop Basics section for more tutorials! And don’t forget, all of our tutorials are now available to download as PDFs!
Managing layers and groups keeps your project organized. You can rename layers, color-code to easily locate similar layers, and delete and export layers as needed.
Rename a layer or layer group
As you add layers or layer groups to an image, it’s helpful to give them names that reflect their content. Descriptive names make layers easy to identify in the Layers panel.
Double-click the layer name or group name in the Layers panel and enter a new name. Press Enter (Windows) or Return (Mac OS).
Select the layer/group and then follow these steps:
Choose Layer > Rename Layer or Layer > Rename Group .
Enter a new name for the layer/group in the Layers panel.
Press Enter (Windows) or Return (Mac OS).
Assign a color to a layer or group
Color coding layers and groups helps you locate related layers in the Layers panel. Simply right-click the layer or group and select a color.
Rasterize layers
You cannot use the painting tools or filters on layers that contain vector data (such as type layers, shape layers, vector masks, or Smart Objects) and generated data (such as fill layers). However, you can rasterize these layers to convert their contents into a flat, raster image.
Rasterizes the type on a type layer. It does not rasterize any other vector data on the layer.
Rasterizes a shape layer.
Rasterizes the fill of a shape layer, leaving the vector mask.
Rasterizes the vector mask on a layer, turning it into a layer mask.
Converts a Smart Object into a raster layer.
Rasterizes the current video frame to an image layer.
3D (Extended only)
Rasterizes the current view of 3D data into a flat raster layer.
Rasterizes all vector data on the selected layers.
Rasterizes all layers that contain vector and generated data.
To rasterize linked layers, select a linked layer, choose Layer > Select Linked Layers, and then rasterize the selected layers.
Delete a layer or group
Deleting layers you no longer need reduces the size of your image file.
To quickly delete empty layers, choose File > Scripts > Delete All Empty Layers.
To delete with a confirmation message, click the Delete icon . Alternatively, choose Layers > Delete > Layer or Delete Layer or Delete Group from the Layers panel menu.
To delete the layer or group without confirmation, drag it to the Delete icon , Alt-click (Windows) or Option-click (Mac OS) the Delete icon, or press the Delete key.
To delete hidden layers, choose Layers > Delete > Hidden Layers.
To delete linked layers, select a linked layer, choose Layer > Select Linked Layers, and then delete the layers.
Export layers
You can export all layers or visible layers to separate files.
Merge two layers or groups
You can merge two adjacent layers or groups by selecting the top item and then choosing Layer > Merge Layers. You can merge linked layers by choosing Layer > Select Linked Layers, and then merging the selected layers. You can merge two 3D layers by choosing Layer > Merge Layers; they will share the same scene and the top layer will inherit the bottom layer 3D properties (the camera views must be the same for this to be enabled).
Merge layers in a clipping mask
For more information on clipping masks, see Mask layers with clipping masks.
Merge all visible layers and groups in an image
A visible layer must be selected to enable the Merge Visible command.
by hannah January 31, 2013 10:26 pm 2,989 views 0
It is a very simple process to merge layers in Photoshop. Follow the quick steps below to learn how. One point to note is that once you have merged layers they will become a raster layer and you won’t be able to un-merge them. If you think you may need to work on the separate layers individually again it may be best to group the layers as this will give you the ability to move the layers around as one without combining them into a single layer. See how to group layers below. Finally, if you have shape layers that you wish to combine and yet want to retain the shape properties and not convert them to raster, you should follow ‘How to Combine 2 shape layers‘.
How to merge layers in Photoshop
example layers
original-layers
Above is my sample file that I have created which you will see contains 7 layers including the background. For this purpose, I want to merge the top 5 layers so that I will be able to move everything as one except for the brown paper and the background.
Step 1.
To do this you will first need to open your layers palette if it isn’t already open (Window > Layers)
Step 2.
Select the bottom layer that you want to merge and holding down the shift key select the top layer you wish to merge. This will highlight them. If the layers you want to merge aren’t next to each other select them one at a time whilst pressing the Apple / Ctrl button.
select-layers-to-merge
Step 3.
There are several ways to merge the selected layers;
A) Right click the selected layers in the Layers palette and chose ‘Merge Layers’ from the menu.
B) Click on the menu arrow on the top right of the layers palette and chose ‘Merge Layers’ from the menu.
C) Use the top menu and go to Layer > Merge Layer
D) Apple E / Ctrl E
merge (A)
All your layers will now be merged into one layer and will be named and positioned in the place of your original top layer.
How to group layers in Photoshop
Step 1.Create a New Group by pressing on the folder icon at the bottom of the layers palette. The new folder will appear above whichever layer you currently have selected.
create-group
Step 2.
Select all the layers that you want to have as a group (see Step 2 of merging layers for how to select multiple layers). Once they are all selected, click on any of the highlighted layers and drag them onto the new group folder you have just created in the layers palette. The layers will appear indented beneath the folder icon.
Step 3.
By toggling the triangle to the left of the group folder you can open and close the folder to show and hide the layers. You can now move all of these layers about as one and transform the items together by selecting the group folder in the layers palette. By grouping them rather than merging them you can still access the individual layers separately and un-group them if you wish.
Need to merge layers in Photoshop? Layers are an essential part of Photoshop photo editing, as they ensure a non-destructive workflow. However, multiple layers will not only slow down your computer but also make your file size significantly larger. Follow this simple tutorial to learn how to merge layers in Photoshop in under a minute.
1. How to Merge Layers in Photoshop?
STEP 1. Activate the Layers Panel
The first step of learning how to merge layers in Photoshop is making sure you can see the Layers Panel in your working area. If you can’t find it, go to “Window” in the main menu and navigate to “Layers”. If you’re a fan of saving time by using Photoshop keyboard shortcuts, you can also use the shortcut F7. This will instantly activate the window.
STEP 2. Select the Layers
This method is perfect for the times when you perform highend retouching, as it allows you to selectively choose layers you want to merge. Hold down the Shift button and choose the layers you’d like to combine. Once you have done that right-click anywhere on the layer and select “Merge Layers” from the dropdown list.
By the way, you can use photo layering apps, to be able to work with layers on your phone too.
2. How to Flatten Image in Photoshop?
This method is usually reserved for the end of photo editing. Photoshop allows you to hide certain layers by pressing the Eye symbol icon next to them. Hide the layers you don’t need, and go to any visible layer.
Then, right-click anywhere on it. From the drop-down window select “Flatten Image”. This will automatically delete the hidden layers.
You’ll see a pop-up box appear, asking you to confirm that you want to discard hidden layers.
As a result, visible layers will be combined into a single one.
3. How to Merge Visible Layers in Photoshop?
This is an excellent method if you need to combine layers in Photoshop quickly. Instead of clicking on all the layers, you want to merge, you can simply hide the layers you do not want to merge. After that, right-click on any visible layer and navigate to “Merge Visible.” Mind, this method doesn’t delete the hidden layers, simply moves them above the merged layers.
4. How to Merge Layers onto a New Layer in Photoshop?
What if you don’t want to delete any layers? This method lets you keep the existing layers, and at the same time merge their copy onto a new layer.
Use the Shift+Ctrl+Alt+E/Shift+Command+Option+E key combination. You’ll see a new layer appear above the original layers. It contains a merged copy of all the layers in your file.
Now, you know how to combine layers in Photoshop and can confidently follow all Photoshop tutorials on YouTube.
Merging layers is necessary when you want to optimize the structure of your file or make several objects behave as one under your manipulations. There are several ways to achieve that.
Merge down
Place the layers you want to merge under one another.
You can do this by simply dragging them on the Layers Panel or by using keyboard shortcut Ctrl (or Cmd) + [ or ]. Those are square brackets, usually located next to the letter P, opening Ctr/Cmd + opening bracket [ moves the layer down, closing bracket ] moves down
Select the top layer, then right-click on the layer or select Layer > Merge Down (Ctrl/Cmd + E).
Selected layer will merge with the layer below
Note: for some type of layers, you will need to select both layers to merge. To do that, hold Ctrl/Cmd and click on the second layer.
Merge Visible
This option, located next to the previous one in the same menu, will merge all the visible layers in your file. Visibility of the layer is toggled by the eye icon on the left of the Layerspanel.
There are several things you need to know to make the most use out of this option.
Click and hold left mouse button on the eye icon and drag down or up across the other eye icons of your layers to turn visibility off or on for many layers at once.
Alt/Option-click on the eye icon to hide all other layers, besides the one you click. Alt-click again to restore visibility back to how it was.
Select the layers you want in the Layers panel by clicking while holding Ctrl/Cmd to add separate layers to selection, or Shift to add whole range of layers between the ones you click. Then go to Layer > Hide / Show Layers.
Tip: You can also select visible layers right on the canvas, by using Move Tool with Auto-Select option turned on, and clicking on the objects while holding Shift.
Flatten entire Image
In a what’s called ‘destructive’ approach to image editing, this is the most destructive option of them all. If you have decided that you’re done with your editing and will never look back, choose Flatten Entire Image option, and it will do exactly as it promises, and merge everything into a single background layer.
Tip: Press Ctrl + Z to undo. Remember to keep back up copies of your important files.
On the advantage side, you don’t have to worry about any possible intricate interactions between blending modes, transparencies, layers effects and other such stuff. Everything will just merge into one thing exactly as it looked.
Hidden option
One of the best and most useful ways to merge layers, and just features in general, is an option that’s nowhere to be found on the Photoshop menu and only exists as a keyboard shortcut.
Press Ctrl/Cmd+Alt+Shift + E to create a copy of all your visible layers as a single separate layer. Unlike our destructive option described above, this is the opposite. Not only It doesn’t touch any of your work, it also creates its complete snapshot as a copy. Use this in combination with hiding/showing layers for most effect.
Organize into groups
If you have a complex file, clicking through visibility of the layers you want to merge at particular moments in the process of your work can become pretty cumbersome. This is where organizing layers into groups will aid merging, and not only that.
To put several layers into a group:
Select the layers you need by holding Ctrl/Cmd or Shift and clicking on them in the Layers panel.
Click on the Create Group button, or go to Layer > Group Layers, or press Ctrl + G.
Note: older versions of Photoshop may require you to hold Shift while clicking the button to put the selected layers into the newly created group right away.
You can also create groups of other groups or combinations of layers and groups and so on. Click on the arrow next to the group icon to expand or collapse.
Now, you can simply select the group you want and press Ctr/Cmd + E to merge all the layers in that group.
Tip: You want to keep the copy of your unmerged layers. To do that, drag your group to the New Layer button in the Layers panel.
Český
Dansk
Deutsch
English
Español
Suomi
Français
Magyar
Italiano
日本語
한국어
Nederlands
Norsk
Polski
Português
Русский
Svenska
ไทย
Türkçe
中文
繁體中文
Layers provide flexibility within Photoshop, allowing you to play around with an image’s individual elements and create a more compelling composition. However, if you’re getting bogged down with too many layers, you might want to combine them into more manageable groups. Learning how to merge layers in Photoshop can simplify your workflow and speed up the editing process. You can also use this technique to flatten all of your layers into one single layer, which is helpful in the final stages of a project.
Need images for your project? Shutterstock’s impressive collection of more than 70 million images can help! See what our library has to offer.
Merging Layers Using the Options Menu
Within Photoshop’s layers panel, you can right-click on any layer to see a long list of options. These include “Merge Layers”, “Merge Visible”, and “Flatten Image”. Before right-clicking, you should select the layers that you wish to merge. There’s no limit to the number of layers you can select.
If you’ve only selected one layer, the “Merge Layers” option will change to “Merge Down”. This means your selected layer will merge with the layer below it on the panel. In addition, your newly merged layer will take the bottom layer’s name.
Use Shift-click or Ctrl-click to highlight multiple layers in the panel. Clicking on “Merge Layers” will combine them into one layer, while keeping the top layer’s name.
Another way to merge multiple layers is by using the “Merge Visible” option. This will merge any layers that are currently visible (i.e. with the “eye” icon enabled). You can hide any layers that you don’t wish to merge by unchecking their eye icons first. If you press Alt while clicking on “Merge Visible”, it will merge the layers into an entirely new group, while preserving the original layers as well.
Finally, choosing “Flatten Image” will merge any visible layers in the panel. Layers that are not visible will be discarded. This is usually one of the last steps of a project, allowing you to save your final image file as one fixed layer.
Remember, once you’ve merged layers and saved your project, you cannot undo it. If you’re unsure whether merging certain layers is the right course of action, you should save a copy of your Photoshop project beforehand.
Linking Layers (Without Merging Them)
So, now you know how to merge layers in Photoshop, but how do you avoid the aforementioned merging issue? To start, you can “link” layers before committing to a merge. It’s possible to unlink the layers at any time, but while they are linked, any adjustments you make to one layer will affect the entire group. This option can also be found by right-clicking on the layers panel.
Meanwhile, the “Group From Layers…” option organizes your layers into separate sections, so you can work on one section at a time without getting overwhelmed with the larger project. You can right-click on the layers panel to find this option, or highlight the desired layers and drag them to the folder icon (found at the bottom of the layers panel).
June 8, 2016. Posted in: Tip Of The Day.
If you hold Alt (Mac: Option) while selecting “Merge Visible” in the Layer menu (or in the Layers panel flyout menu), you will merge the visible layers onto a new layer; leaving the original layers intact.
You could also press Ctrl Alt Shift E (Mac: Command Option Shift E) to get the same result.
Sign-up for the PTC Newsletter so that you’ll never miss a tutorial!.
Primary Sidebar
Join Over 52,000
Photoshop users who subscribe to receive tutorials straight into their inbox!
About Me:
Jesús Ramirez is the founder of the Photoshop Training Channel, a top Photoshop training YouTube channel with more than 1,300,000 subscribers. More.
Click The Buttons Below!
Tutorial Flashback
Using The Script Events Manager In Adobe Photoshop CS6
Search
Upcoming Events
Jesús Ramirez will be presenting at the following conferences or events:
June 10, 2019
CreativePro Week 2019
CreativePro
Seattle, WA
by hannah October 14, 2011 8:18 pm 17,961 views 3
The best way to combine 2 shape layers in Photoshop is to keep both shapes in a vector format so they will still be editable. However, there is a quicker option available if you are happy for the finished product to become a raster layer.
The 2 separate shapes
Shape 1
Shape 2
2 separate shape layers
The raster option
The easiest way to combine 2 shape layers in photoshop is to select the 2 layers in the layers palette (press shift to select more than one layer at a time) and right click on one of the layers in the layers palette and choose merge layers. This will combine both your shapes into one raster layer but the individual Shapes will no longer be editable or scalable.
Select both shape layers Right click & choose merge layers
Combined in 1 raster layer
The vector option
The best way to join 2 shape layers is to select all the path points on one shape layer. To do this, use the direct selection tool and press shift to select multiple points.
Use the direct selection tool
select all the points in one of the shapes
Once all the points are selected you can press Apple C / Ctrl C or Edit > Copy. Apple X / Ctrl X or Edit > Cut to delete the layer.
Select the other vector shape which you want to combine it with and select the shape area in the layers palette.
Select the vector mask thumbnail
With the pen tool selected choose ‘Add to Shape area’ from the shape option tool bar.
Pen Tool Add to shape area
Apple V / Ctrl V or Edit Paste. Your 2 shapes will now be combined within one shape layer.
Combined Shapes
Combined within 1 shape layer
To combine shapes whilst drawing new shapes
To combine shapes whilst drawing with the shape tools, make sure the ‘Add to Shape area’ option is pressed as you start drawing each new shape.
Why combine shape layers?
The advantages of combining 2 shape layers means that you can not only move and scale shapes together whilst keeping them in proportion to each other but also apply layer styles such as gradients and shadows to what appears to be one seamless shape.
2 shape layers with layer styles applied
combined shape layers with layer styles applied
Popular information


Popular articles

Latest articles